Trusted Hands Contracting
Trust us to make your Home Safe and Beautiful
Protect Your House with These 5 Tips


Keeping your home safe and beautiful is what we do at Trusted Hands Services. While everyone wants to live in a beautiful home, safety should be everyone’s primary concern. When people think of home safety they often think “inside” the home. While fire alarms, radon gas detectors, fire extinguishers, and first aid kits are important, what’s the point if your roof is leaking, mold is growing, bees are nesting in your attic or rats are living in your gutters? Here are five ways to protect your house and safeguard your family.
Don’t Ignore Rotting Wood
Paint and stains do not protect wood forever, and even under several coats of finish, wood can rot and go undetected for a long time. Many people don’t realize that wood rot spreads. A small area of rotting wood on the outside of your home will grow larger with time. Rain and humidity will speed up the spread because they create an environment where fungi grow, causing wood fibers to deteriorate and rot. The rot that starts outside can eventually spread inside your home and over time, wood rot can undermine the structure and make it unsafe. Outside staircases with wood railings, wood frames for doors and windows, and wood decks, balconies or porches are the primary areas where rot starts.

If the wood is soft when you press on it, it probably is in some state of rot and should be replaced. While there are some wood rot repair products available, I do not recommend them, especially if the rot is found on beam or joints that provide structural stability. Rotting wood on any floor surface should always be replaced to avoid an accidental cave-in and injury. Depending on the amount of rot, steps to replace rotting wood can include, removing nails and screws from the rotted planks, removal of rotten portions of wood, applying a sealer, reinforcing joists, and replacing damaged portions or the entire plank.
Damaged Siding Can’t be Repaired
Buckled or warped vinyl siding will allow moisture and termites to unprotected outside surfaces of your home. This is usually caused by heat, either directly from the sun or a grill that was placed too close to the house. Siding will expand and warp or buckle, especially if was nailed too tightly to the home. Hail can also damage siding and leave cracks or holes in the surface. Once the damage is done, it cannot be repaired. However, you can replace the damaged part and is a rather simple job requiring only a few tools that can be found in your local hardware store.

Working Soffits Can Cut Energy Bills

The soffit refers to the material forming a ceiling from the top of an exterior house wall to the outer edge of the roof. A ventilation system is often installed in the soffit that keeps steady airflow between roof and attic. This helps to release heat buildup inside the attic. During summer months the heat inside your attic could reach 150 degrees Fahrenheit or more. This can result in higher cooling costs so everyone looking to save money on their electric bills should make sure their soffits are in good working order. Along with the heat, humidity also builds up and can condense during overnight hours, causing insulation and building materials to deteriorate.
Another important job of the soffit is to keeps animals and insects out of your home. Once bees make a hive in your attic, it can be expensive to have them professionally removed. According to Cost Owl, a bee removal job can cost as much as $1,000 to $2,000 plus repair and reconstruction costs. Trusted Hands Services recommends regular visual inspection of your soffit for cracks and holes. Repairs can be done using filler products or in advanced stages of rot or deterioration, replacing wood planks is needed.
Things to Know when Replacing your Fascia
The fascia is the long straight board along the lower edge of the roofline. This is one of the most important and vulnerable places on the exterior of your house. First off, it is the last line of support for the lower edge of the bottom row of the roof tiles/shingles. Second, it is the place where gutters are installed so it constantly gets soaked during rainstorms. Finally, it can be seen, so it needs to do its job and look good at the same time.
If you are planning to replace your roof, be sure to repair or replace damaged fascia before the roof work is done. It’s both easier and cheaper to replace rotten wood before a new drip edge is installed by your roofer. Things to keep in mind when repairing fascia include the type of wood used and the placement of the nails. Select only wood that will withstand the climate where you live. An experienced carpenter will know where to nail the wood so it won’t split. Finally, always use stainless steel nails and additional protection with a good coat of paint.
Keep Gutters Clean
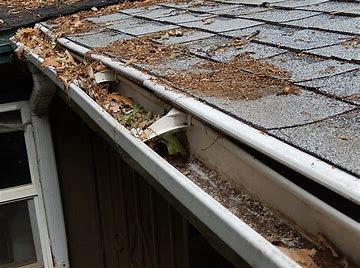
Gutters are an essential part of your home protection. They serve to control the flow of rainwater away from your roof and protect your walls, foundation, and landscaping. Unfortunately, gutters need to be cleaned regularly to prevent leaky roofs and water damage. On top of that, gutters filled with leaves and twigs make nice homes for insects and rodents. Mold grows in rotting leaves that can spread inside your home. When clogged gutters get heavy they can sag or pull away from the fascia board, causing wood rot.
The exterior of your home is your first line of defense against bad weather, insects, and critters. Trusted Hands Services knows how to protect your house and safeguard your family. They have a team of expert carpenters and masons ready to handle all your exterior home needs. Services include everything covered in this article and more, like window replacement and shutter installation. For more information on windows, read our recent article. Contact Frank at 813.520.000 or here to start your home safety project today.
Stay Safe with these Hurricane Shutters

Trusted Hands Services is all about keeping your home safe during storm season. Here we are in July and the first month of hurricane season is now behind us. In only a few months we will be in the height of the Atlantic hurricane season. September and October are the most active months for storms developing in the Atlantic Ocean and moving westward toward the Gulf of Mexico and the United States east coast. While that’s only a couple months away, there is still time to safeguard your home. Hurricane shutters are an effective way to protect your property from storms and Trusted Hands Services can help to select and install the right shutters for you.
There are several types of shutters available. It’s important to consider how the shutters will look once installed, the ease of operation and the cost before making a selection. Here are some of the options available. . .
Automatic Rolldown Shutters
These are permanently installed to the exterior of a home, made of stainless steel, PVC, or metal and usually the most expensive option. They roll down from a box above the window, along a set of tracks and lock at the bottom of the window. Once these shutters are lowered, daylight is blocked and the inside of your house is dark. They are convenient, functional, and easy to raise and lower either manually by a hand-crank or automatically by a push button. The manual crank is the best option because they can be operated even if the power goes out. After a storm like Irma, parts of the Bay Area were without power for days. Everyone who lost power and had automatic rolldown shutters had to live in a hot, dark house until the power was restored!
Accordion Shutters
These hurricane shutters are also permanently installed to the exterior of a home. They are made of metal or polycarbonate interlocking vertical blades that resemble an accordion. Unlike rolldown shutters, these are installed on both sides of windows. They are opened by rolling them across horizontal tracks mounted above and below the window, locking together at the middle. These are manually opened and closed and come in both solid and clear surface options. That means during the storm, clear accordion shutters will let the sunlight in.
Bahama and Bermuda Shutters

Like rolldown and accordion shutters, Bahama and Bermuda hurricane shutters are permanently installed to the exterior of a home. But unlike rolldown and accordion shutters, these are always visible. They are also used to provide shade and can provide design character to the home. Their design will block the view, especially of the sky. They are usually made from fiberglass or metal and mounted on a hinge just above the window. They prop open to provide shade and deployed for storm protection by removing the supports and locking them to the bottom of the window.
Colonial Hurricane Shutters

These are two-piece louvered shutters that attach to the wall beside each window. They are made from many materials including wood, plastics, and metal and offer varying degrees of protection depending on the material used. They can be moved into place before or during a storm by one person and are sometimes secured with a bar that lowers over the closed shutters.
Storm Panel Shutters
Storm Panel Shutters are large panels of steel or aluminum that are cut to any size window. They slide into place before a storm on rails mounted above and below the window. Storm panel shutters can also be used to cover doors making this a single solution to protect all openings to the home. These are usually the least expensive option and since they are not permanently attached, they don’t change the look of the house. The downside is that they must be stored somewhere when not in use. Installation can be labor intensive and require more than one person. So it is important to put them up before high winds begin. I also recommend clearly labeling each shutter so you can easily match panels to the correct window.
Options not Recommended
Plywood panels do not meet building codes so I do not recommend them. Another thing I would recommend against is the practice of use tape on windows. Tape will not strengthen the glass and may actually be dangerous when a window breaks. Tape can hold shards together in large, sharp fragments that can easily cut someone. I do not recommend tape for this reason. Smaller shards are easier to clean up and less likely to cut you.
There are many hurricane shutter options on the market to protect your home. And while they are all worth the investment, they have different strengths and come at different price points. When you are ready to buy and install shutters or assistance with putting up when a storm is coming, contact Trusted Hands Services or call us at 813-520-0000.
New Windows Keep your Home Safe & Beautiful

It’s time to get ready! June officially marks the start of the 2018 hurricane season. It runs through November and peaks in September and October. There is still time to prepare but not much. NOAA, the National Oceanic and Atmospheric Administration, predicts a near-normal hurricane season with 10-16 named storms and 5-9 hurricanes with winds topping 74 miles per hour. If the prediction is right, we could have fewer storms than last year. That’s good news. But remember, it only takes one big storm to cause significant damage. Now is the time to install new windows in your home. Protection is just one of the many benefits you get in return. Trusted Hands Services has installed thousands of windows and can help with any window repair or replacement project.
New Windows Provide Protection from Storms
There are a lot of benefits to new windows. Impact resistant windows withstand high winds and the impact from debris hitting them during strong gusts. Impact resistant windows are engineered, tested and manufactured to handle winds over 160 miles per hour. Some parts of the Tampa Bay Area require them so it’s best to find a professional home renovation company to help. Trusted Hands Services knows building codes that apply to your neighborhood and can help with selection, style, and installation.

Energy Savings
Not everyone needs impact resistant windows, but everyone will benefit from getting any type of new window for their home. First off, new windows are almost always made better than the old ones. Their casings are stronger, seals are tighter, and they are better insulated. That means homeowners will save on electricity immediately after installation. Windownation.com estimates energy savings from $101 to $583 per year for every single-pane window replaced with an Energy-Star rated window. On top of that, utility companies often provide a rebate for new window installation. Utility companies require certain standards to qualify for the rebate, so be sure to check with your electricity provider before you make your purchase.
Insurance Savings
Another cost savings can come from insurance companies. New windows offer better protection against break-ins and are made with tempered glass to reduce the risk of injury if they are damaged. This means homeowner’s insurance companies often lower rates on policies to homeowners that install new windows!
Clean and Quiet
Along with saving money, your house will stay cleaner because dust won’t be blowing in through loose fitting windows, and a light tinting protects your furniture against harmful UV rays that fade and discolor fabrics. New windows also reduce the noise from outside, creating a peaceful sanctuary for your family to rest and recharge.

Help the Environment
By installing new windows, you can help the environment too! Based on a recent windownation.com article, new windows can reduce carbon dioxide emissions by up to 6,200 pounds per year. Recycle old windows by using them as picture frames and displays. Paint the frames in a bright color or leave them as they are for a more distressed look. Hang them in front of a large photo of a mountain scene or cityscape to create a sly visual effect! Consider hanging a wreath or an artful clock on an old window and hanging it above a fireplace mantle. Add sturdy hooks to an old window frame, mount it on the wall in your mudroom and use for coats and bags. There are lots of great ideas on how to repurpose used windows. Find more ideas at remodelaholic.com.
New Windows Raise the Value of your Home
Finally, new windows will increase the value of your home! So, when you’re ready to sell, you can justify raising the sales price. According to windownation.com, the average home can recoup as much as 74% of the cost of new windows when the house is sold. This is a tremendous value and much higher than other renovation projects. For example, a complete bathroom renovation will increase the value of a home between 48% and 67% of the cost depending on where you live.

A Better Quality of Life
In addition to cost savings, better protection, and a cleaner, quieter home, new windows can enhance the beauty of your home in many ways. First off, new windows can increase natural sunlight that provides a fresh look to any room. Bay windows and window transoms open a whole new viewpoint to the world outside and showcase a garden or frame a water-view in a whole new way. Window frames also provide a sense of warmth to a cozy room that invites a family to spend time together with fun, indoor activities. That’s the best benefit of all!
With all the cost savings and lifestyle benefits of new windows, the decision to replace your old windows is an easy one to make. From protection against storms and burglary to creating a warm and cozy room to relax and reconnect with family and friends, you will never regret your decision. To get started on a window replacement project, contact Frank at Trusted Hands Services at 813.520.0000 or at trustedhandsservices.com.
How to Plan for a Smooth Home Renovation

Home renovation projects sometimes go smoothly and finish on schedule and under budget. Other times. . . not so much. While watching a recent episode of “House Hunters” I was struck by a man insisting he and his wife shop only for a move-in-ready house because the home renovation on their current house “almost wrecked” him. That sounded like a terrible experience and it got me thinking about the countless renovations done by Trusted Hands Services. Some went more smoothly than others. The biggest lesson I can share is that planning for a home renovation is just as important as the work itself. Gaining a beautiful new room should never come at the expense of your sanity or relationships. Here are some guidelines for how to plan for a smooth home renovation.
Home Renovation Software
There is some great renovation planning software on the market. If you are planning your first renovation project of it’s been a while since your last project, planning software can be really helpful for keeping track of all the scheduling and budget details. Plus, they can provide some insights and tips easily overlooked to eliminate stressful situations down the line.

Hire an Architect for a Big, Smooth Home Renovation
For a big renovation involving room additions or moving existing walls hire a qualified architect to draw blueprints. Contractors use them to make sure the finished renovation is exactly what was planned and all local and state building code requirements are met.
Plan for Delays
If you are planning for a four-week project, make sure your contractor confirms this timeframe is realistic, then add a least a week for unexpected delays. That date should be your new expected finish date. If everything goes according to plan, then your project will be completed early! Cutting down the actual work time by having all your permits issued and building materials delivered before the job gets started is a great way to keep the project on track.
Expected Extra Costs
When setting a budget for your project, confirm all materials prices and estimated labor costs, then add an additional 10% contingency sum. Unexpected expenses can occur. This could be a stressful situation if the budget is tight. When this happens, knowing there are contingency funds to cover these unexpected expenses will help you keep your cool. If you find the budget is more than you can afford, scale back the project by taking something out, but never take out the contingency sum. You will use it, guaranteed!
Calm and Crazy
Construction dust gets everywhere so plan for a mess and how you will live while the project is underway. If you can, move to a nearby hotel or a friend’s home while yours is being renovated. If not, a plan for a smooth home renovation must include tips for how to live in your home while it is a temporary job site. Divide the house into a calm side (those rooms not being affected by the renovation) and a crazy side (the rooms under construction). Shut off the crazy side with heavy layers of plastic sheeting to contain the mess. Rent a temporary storage unit for the contents of the crazy side so the calm side will not be affected and feel normal. Having a quiet, comfortable retreat will keep life normal and stress to a minimum.

Don’t forget Fido!
Pets and home renovation projects are like oil and water. They don’t mix. Workers coming and going and loud noises from a construction site will stress them out. Dogs, especially, have very sensitive ears so if noises are loud for us, they are even louder for them. If possible, find a place for your pets to stay, at least during construction hours. Calm and happy pets will help keep everyone calm.
Constant Contact
Plan to spend time each day reviewing the work done and set up a daily appointment with your contractor to discuss the progress of the job. If unexpected issues come up, be ready to make quick decisions. A quick fix will help keep the project on schedule and ensure your expectations are met. If your contractor doesn’t want to talk with you every day, find one that will. Communication is the key to smoothly resolving issues and meeting your expectations.
Home renovations don’t have to be stressful. These tips on how to plan for a smooth home renovation will help you keep your sanity while you upgrade your home. A good contractor, like Trusted Hands Services, can make all the difference. They provide reports on progress, keeping the project on schedule, clearing debris and cleaning up construction mess every day. When the project is done, your experience should be as good as your new rooms look! Here are some additional tips to hire a contractor. And to get started on a home renovation project of your own, contact Trusted Hands Services today at 813.520.0000.
12 Steps to Hiring a Contractor for your Home Renovation Project

By Frank Figari | April 2018
Hiring a contractor is something every homeowner faces when it’s time for home renovations projects. Often times the hardest part of a home renovation project is finding the right contractor to do the job. Trusted Hands Services bids on projects every day and we’ve seen lots of different ways people go about this process. So to help with finding the right company for the job, here are 12 steps to hiring a contractor for your home renovation project.
1. Before you call. . .
Have a general idea of your project before approaching a contractor. For instance, if you want a bathroom renovation, make decisions on if you want new tub or shower. Do you want to move the location of a sink or toilet? Do you want a new floor? Is the current lighting sufficient or do you want to install additional lights and outlets? Knowing these things and communicating with your contractor help to steer the project and keep you in control.
2. Now make the calls
Contact at least three contractors or handymen and make sure they are licensed to work in your area, bonded and insured. Once their credentials are confirmed, meet each one in person. This the best way to determine if you will feel comfortable about having them work in your home, especially if you cannot be home while they are there working. Trust your instincts on this and remove from your list anyone who you don’t feel right about.
3. Get References and Do Your Homework
Make sure the contractor has experience in the type of work you want to be done. Ask for pictures from similar jobs recently done. Ask for references from people who have used the contractor in the past, especially those who have had similar work done. Then check out all the references. Also, check for formal complaints filed against the contractors you’re are considering on trusted websites that post ratings and reviews.
4. Bid the Same Scope of Work
Once you have three companies you feel comfortable with and have the right experience and reviews, start the bid process. You need to get a comparable bid from each. The key here is to make sure each contractor bids the exact same scope of work. If everyone is working from the same playbook, then you can fairly compare costs and timetables of each bid.

5. Permits
Make sure the contractor will pull all the necessary permits. This is very important, especially for inspections and financing.
6. Lein Release
Ask about the people who will do the actual work. If they are independent sub-contractors you should get a lien release. A lien release will protect you in the event the contractor doesn’t pay the subcontractors. Always check your state’s construction lien laws to protect yourself.
7. Detailed Breakdown
Before hiring a contractor get detailed bids in writing that breakout all materials separately with estimated labor hours.
8. Timetables and Penalties
Make sure your proposal/contract has the start date and projected completion date outlining a schedule with tasks and timing for each part of the project. Make sure your contractor agrees to any penalties for missed deadlines.
9. Change Orders
During the course of the work, plans may change, so make sure the contractor provides a change order or updates the original estimate to reflect the changes. Make sure the contractor understands that all changes must be authorized by you before the revised work is started.
10. Talk to Me
Clearly tell your contractor which type of communication you prefer. If you like to speak directly with your vendors, make sure the contractor picks up the phone or calls you back. If you prefer email or text messages, make sure the contractor understands that. Whatever you prefer, make sure you tell your contractor and get agreement to the best times of the day to communicate and a reasonable time for returned communication.


11. Weekly Recap
If the project is large and will take several weeks or months to complete, ask for a weekly recap of progress based on what you agreed upon. This will hold the contractor accountable and ensures the project stays on schedule. If delays occur due to things within the contractor’s reasonable control, then charge back the delay penalty agreed to during the bid process.
12. Satisfaction Before Payment
Finally, make sure the contractor agrees to a “final walk through” of the project to make sure you are satisfied the job is completed to the agreed upon standards before you make the final payment. It’s easier to get things corrected before you make the final payment than it is after the contractor has been fully paid.

And one last thing, if you had a great experience with your contractor then tell your friends and write a nice review or testimonial. Good reviews are really helpful and appreciated.
When you are ready for a big home improvement project, hiring the right contractor can make the difference between a project that starts on schedule, stays within a budget and is completed on time, or a project that costs more time and money than you expect. These 12 steps to hiring a contractor for your home renovation project make sense, need to be a standard operating procedure and are keys to a successful project. Trusted Hands Services is ready to tackle all of your renovation and handyman jobs with services designed to make your home beautiful, functional and safe. To get started on your project, call us at 813.520-0000 or contact us here.